
Showing posts with label amethyst. Show all posts
Showing posts with label amethyst. Show all posts
Saturday, October 11, 2014
Maine Craft Weekend
It's Columbus Day weekend--the real sign that the summer season is coming to an end. This year, I'm participating in the statewide Maine Craft Weekend. My home studio in Damariscotta is open both Saturday and Sunday, 10:00 am - 2:00 pm. Contact me for more information. I'll be working away in the studio, so stop on by and see what's new.

Monday, June 4, 2012
Newly Finished
I jumped back into the studio last weekend after nearly a month of crazy busy-ness. I'm so happy new designs are happening! Here's a sampling of what I've finished:


Another idea I've wanted to explore is creating my double dome beads and featuring them singly on sterling silver cables. Here are a couple I've just finished.


Similar to past necklaces, I made a fun flower clasp to complete the look.

And... last but not least, this flower is a new belt buckle. It's made of 18g and 20g sterling silver. Just need to go to the leather guy and get a belt made!


This necklace with pendant follows along the design line I was working on back at the end of April. This is a natural amethyst and quartz druzy bezeled in fine silver with an 8mm amethyst cabochon. The hammered silver curves around the stone and forms the loop bail. The bail easily slides over the small faceted amethyst beads.

This sterling silver pendant is file carved with a brushed finish. The Peruvian opal is bezeled in fine silver and a freshwater pearl dangles belong. A large sterling bail slides effortlessly over a necklace of amazonite and freshwater pearl beads. This pendant is also versatile as it comes off of the beaded necklace and can be worn on a silver chain or wear the beads alone.

These sterling silver earrings were designed to compliment the opal necklace. 5x7mm turquoise cabochons are set in the file carved, brushed silver face.
Another idea I've wanted to explore is creating my double dome beads and featuring them singly on sterling silver cables. Here are a couple I've just finished.

This is 1 inch diameter and features stamped squiggles & dots that are liver of sulphured and then brushed.

This is 1 1/2 inch diameter with varying sized holes pierced through.
I made another double dome bead with stamped flower silhouettes on both sides and decided to string it on an amber nugget necklace.

Similar to past necklaces, I made a fun flower clasp to complete the look.

And... last but not least, this flower is a new belt buckle. It's made of 18g and 20g sterling silver. Just need to go to the leather guy and get a belt made!

Sunday, February 5, 2012
A Few New Things
Happy Birthday to me! Well actually it's passed now, but I'm declaring this to be my birthday month!

A gift of living flowers to brighten the house and the mood to start my birthday. And then a wonderful dinner with my parents, husband, and friend (and dogs too). And then a nice chunk of time to work in the studio. And here's what I finished:

These are reticulated silver earrings with sterling squiggles and balls with 4mm amethyst cabochons.

Then I worked up these long, thin heavily reticulated earrings with balls and pale pink faceted tourmaline bead drops.

I also finished this pin/pendant on Friday. It's been in process for a while but I wasn't happy with what was happening. So, I kept looking at it and looking at it and looking at it and finally it hit me--I turned the piece vertically, added another small bezel and then the bead drop at the bottom. The Sleeping Beauty turquoise just sings with the silver.
I have a bunch of other thing in various stages of creation, so keep looking back here and you'll see a lot more new designs.
Monday, November 29, 2010
Flowers for Everyone
A full day in the studio=5 pairs of new flower earrings!

With the sun shining bright today, I managed to get some decent photos of the new earrings. Here they are individually:
 These are 2 flowers, large and small, that I've soldered together with a hammered ball center. I've suspended them on a standard earwire.
These flowers are domed so the middles are pushed in and the petals are curving outward and back. These also have a hammered silver ball center.
 These flower dangles are shaped with curving petals and lots of silver balls soldered in the centers. I love the long earwires.

Large tumbled, faceted amethysts are capped with the flower caps. They are made of 2 different sizes of flowers that were dapped and soldered together and drilled through the center. I inserted a headpin through the bead and cap and twisted it into a loop at the top and suspended from silver earwires.
That's all for this weekend. New things are still brewing and hopefully I'll have time in the next few evenings to finish a few more things. Can you believe there's only 1 more day until December! How am I going to finish all the things I want to do?!
Monday, November 8, 2010
November Grays
There's something about November in Maine that makes you wish you lived somewhere else. It has been gray and cold and rainy since the calendar flipped and now that we've turned our clocks back and it will be dark by 4pm. Motivation runs thin, as the chores to prepare for winter stack up. But, there are happy glimmers about upcoming holidays and events that will wash away the grays in twinkling white.
Well, I guess that's all of my November complaining--back to creating. I'm still stuck on cuff bracelets and thought I'd vary the theme a little. I've reticulated silver discs and joined them together to form the body of the cuff. I then shape the body around the mandrel and embellish the seams with silver balls.
 I've been playing around with a large, beautiful amethyst cabochon and think I'll probably set it in this cuff. Here's how it looks from the front after soldering a fine silver bezel and more silver balls. I've cut out the back for the light to shine through the stone. This is it from the side.
 The center disc is 2 inches, which is followed by a 1 3/4 inch disc and ends with a 1 inch disc. The stone is 18 x 25mm oval. Here's how the piece looks finished:


I like the repeating shape around the wrist, as well as the simplicity of the design. I'll continue looking at it and decide if any changes will made.

Well, I guess that's all of my November complaining--back to creating. I'm still stuck on cuff bracelets and thought I'd vary the theme a little. I've reticulated silver discs and joined them together to form the body of the cuff. I then shape the body around the mandrel and embellish the seams with silver balls.

 The center disc is 2 inches, which is followed by a 1 3/4 inch disc and ends with a 1 inch disc. The stone is 18 x 25mm oval. Here's how the piece looks finished:
I started this other cuff and I'm not sure if it's finished or not. It's 7 one-inch circles that are reticulated and fused together. I formed the cuff shape and then embellished the second, center, and sixth discs with bars and balls.


I like the repeating shape around the wrist, as well as the simplicity of the design. I'll continue looking at it and decide if any changes will made.

More rain and gray today and we had (and survived) our first power outage--November, it's a real challenge!
Tuesday, October 12, 2010
Similar But Different
Here it is--the latest cuff bracelet!

What do you think?! The big difference with this piece is the metal--I used pre-reticulated silver which is more highly textured than what I've been creating; and while I like it, I do feel it is busier looking and I didn't want to embellish it as much. So, I decided to keep it simple. I used some large silver balls that I lightly hammered and soldered them along the seam line. I then added 5 tall pieces of silver that I mounted bezel settings on. I set four 3mm rhodolite garnets and one 3mm amethyst. Here is another view--note the height of the stones, as well as the varying height of the balls.


What do you think?! The big difference with this piece is the metal--I used pre-reticulated silver which is more highly textured than what I've been creating; and while I like it, I do feel it is busier looking and I didn't want to embellish it as much. So, I decided to keep it simple. I used some large silver balls that I lightly hammered and soldered them along the seam line. I then added 5 tall pieces of silver that I mounted bezel settings on. I set four 3mm rhodolite garnets and one 3mm amethyst. Here is another view--note the height of the stones, as well as the varying height of the balls.


To achieve the final finish, I brushed the bracelet with several different wire brushes, which allows the metal to shimmer and shine.
And that's all for now.
Sunday, October 3, 2010
A Successful Finish
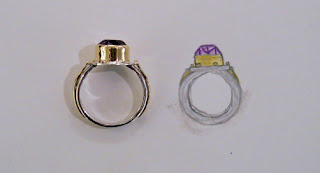
Here it is--Betty's ring! What an exciting project to create from start to finish. I started with an antique, unwearable ring with a fantastic stone and worked with my client (Betty) to create a new ring that she would wear, but also keep the memory and beauty of the old ring alive. And here is how we began--with a sketch:

The ring is made up of sterling silver and 18k gold, along with the original 10.5mm amethyst gemstone and gold ring shank. It doesn't look like much, but as we based this ring design on other rings I have made, we could work in the parts that we liked and knew would enhance the features of the gemstone.

I made all the pieces for the ring and had one final meeting with Betty to show her before I put it all together. Notice the original ring side pieces--they are gold and fluted. The new ring shank is crazy 8 profile in sterling silver, which is a very comfortable shape for a shank. The bezel is 18k on a sterling face. And...

...later that week, the ring gods were with me. I put the pieces together and finished the ring off without a hitch. One final sizing on Friday, delivery day, and it is going back home to Florida for the winter to be shown off. Here's a bunch of different views to give you the full affect:


Betty, thank you sooooo much for giving me this opportunity--allowing me to create a special ring for you. Enjoy wearing it and I look forward to seeing you next year.

The ring is made up of sterling silver and 18k gold, along with the original 10.5mm amethyst gemstone and gold ring shank. It doesn't look like much, but as we based this ring design on other rings I have made, we could work in the parts that we liked and knew would enhance the features of the gemstone.

I made all the pieces for the ring and had one final meeting with Betty to show her before I put it all together. Notice the original ring side pieces--they are gold and fluted. The new ring shank is crazy 8 profile in sterling silver, which is a very comfortable shape for a shank. The bezel is 18k on a sterling face. And...

...later that week, the ring gods were with me. I put the pieces together and finished the ring off without a hitch. One final sizing on Friday, delivery day, and it is going back home to Florida for the winter to be shown off. Here's a bunch of different views to give you the full affect:


Here are some pics with the ring next to the original drawing. I actually could see the three-dimesion in my mind while looking at the drawing. There's a little difference, but overall an accurate project from start to finish.


Betty, thank you sooooo much for giving me this opportunity--allowing me to create a special ring for you. Enjoy wearing it and I look forward to seeing you next year.
Sunday, August 22, 2010
Fall Is In the Air
It's been showing itself slowly--a whisper of cool air, yellow crowns of goldenrod, and even a tip-tinged maple--glimpsing shots of fall. With back to school a week away and colorful notebooks and newly sharpened pencils lining the shelves of stores, I find myself getting ready--ready for what's next. Lot's of thinking and ideas to work through and many of those will come out in the next few months. But, (sigh), I have work to do (now) and jewelry to create, so today I found myself continuing with my reticulation series.
Here is a new reticulated silver cuff with overlap and silver and gold balls bubbling over the lip.

I see a wave--kind of an abstracted ocean look with this--what do you think?
I also completed these earrings:

They are reticulated sterling with balls and 4mm amethyst cabochons bezeled in fine silver. The bottom circle wiggles under the top, while reflecting the light beautifully.
I'm continuing with my favorite series and am coming up with new ways to invent designs and expand my jewelry lines. This will be an exciting time--just stay focused on all the positive. Fall is my favorite time of year--wearing a sweater on cool nights, breathing the salty ocean air, and slowing down to a comfortable pace after all the craziness of summer. I'm not wishing it to arrive sooner than September 23rd, but I am certainly looking forward to it!
Monday, July 19, 2010
Flowers for Inspiration
I thought I'd show you some of the new flower and leaf jewelry I designed over the weekend. I always look to nature to give me a little push in the designing direction. Here's a pair of silver dapped flowers that I stacked back to back and dangled an amethyst bead.

Another pair of flower earrings, these with silver balls soldered in the centers and the petals are curled out--very graceful and light.

And these little cuties. They are sterling with 24k gold centers. They are about 1/2 inch in diameter and have stud backs--perfect little touch of summer.

And finally a couple pairs of joined leaf earrings. Each pair is sterling with a bead drop--the left with green tourmaline and the right with rhodolite garnets.


Sunday, July 18, 2010
Super Sunday
Got a call from Barbara at CRAFT and she told me I had my first sales! Yeah!!! A reticulated cuff bracelet and a pair of earrings. I am so excited and it added to my creative drive this weekend.


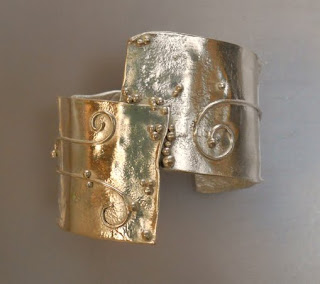


I thought I'd start this entry off by showing you the finished reticulated rectangle bracelet from a couple days ago. I set two 4mm amethysts and really like how it turned out. The overall photo doesn't show the bracelet off, but you get an idea. This detail focuses in on one of the rectangles and you get to see the texture and added balls and bars.

I hopped right into designing a couple of new reticulated cuff bracelets too. They have been very popular and I really like to make them. The first has an overlap in the center with sterling balls and three curly bars. I heated the edges until they softened and the line became very organic.

The second cuff was an excercise in "design as you go." I had a few pieces of silver to work with, so I reticulated them and then joined them to form the cuff. So you have a little sense of scale, the center piece is 2 inches square. I added a bunch of silver balls along the seems and thought the result was very effective--they brought the attention to the center. I continued adding random balls to the front and decided that a stone (or stones) would be a great touch. So, I started playing around placing various cabochons on the square and came up with these assorted green stones in different shapes and sizes. The large square is an 8mm green tourmaline. There are also two 3mm green tourmalines and two peridots, one 4mm, one 3mm.

That's all for today--more flower designs in process for tomorrow.
Thursday, May 13, 2010
Stealing Time

I've been stealing an hour before work and an hour or two after dinner to keep moving forward with some new designs. I selected a pretty purple amethyst cabochon to be the center stone and started designing from there. Keeping in the style and series of my previous rings, this bezel is 18k royal yellow gold with ball accents on sterling silver that is lightly hammered.

 Because the amethyst's color is enhanced by the natural light shining through, I cut the backing out and raised the setting off the ring shank.
 I hammer set the cabochon and highly polished the edge and gold balls. Haven't quite decided if I will polish the whole ring or keep it with a brushed shank, but this is how the ring looks for now because--it's time to go off to work!

Subscribe to:
Posts (Atom)


 Posts
Posts

